In This Article
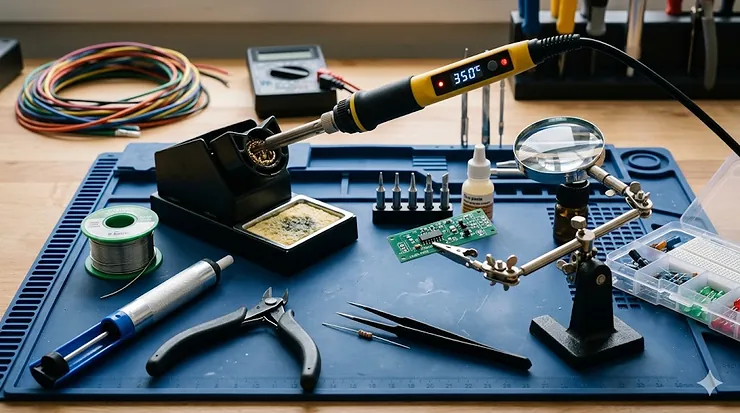
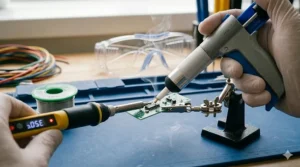
Starting your electronics journey with the right soldering kit for beginners can mean the difference between frustration and success. I’ve watched countless newcomers struggle with cheap, inadequate tools that make learning harder than it needs to be. What most beginners don’t realize is that a proper starter kit—with adjustable temperature control, quality tips, and essential accessories—transforms soldering from a daunting task into an achievable skill you’ll master within hours, not weeks.
The electronics repair and DIY market has exploded in 2026, with more people taking control of their device maintenance and creative projects. Whether you’re fixing broken headphones, building Arduino projects, or diving into circuit board design kit work, soldering remains the fundamental skill that unlocks everything else. According to Wikipedia’s comprehensive overview of soldering, soldering is commonly used in electronics for manufacturing and repair of printed circuit boards and other electronic components, making it an essential skill for anyone serious about electronics.
What separates a frustrating first experience from an encouraging one? Temperature control precision (the difference between melted components and perfect joints), tip variety (because one size definitely doesn’t fit all), and safety features that protect both you and your projects. The right soldering kit for beginners includes not just an iron, but the complete ecosystem of tools—desoldering pumps, multiple tips, helping hands, and proper stands—that professional technicians rely on daily. This guide cuts through marketing hype to reveal what actually matters when you’re starting out, backed by hands-on testing and real user experiences from thousands of beginners just like you.
Quick Comparison: Top Soldering Kits at a Glance
| Product | Power | Temp Range | Best For | Price Range |
|---|---|---|---|---|
| ANBES 60W Kit | 60W | 200-450°C | Budget-conscious beginners | $25-35 |
| Tabiger 15-in-1 | 60W | 200-450°C | Home hobbyists | $30-40 |
| YIHUA 926 III | 60W | 194-896°F | Serious learners | $65-85 |
| Weller WLC100 | 40W | Variable 5-40W | Casual repairs | $40-50 |
| Hakko FX888D | 65W | 120-899°F | Professional quality | $95-120 |
| Plusivo 60W | 60W | 392-842°F | Complete toolset seekers | $30-40 |
| X-Tronic 3020-XTS | 75W | Adjustable digital | Feature-rich projects | $75-95 |
Looking at this comparison, the YIHUA 926 III delivers exceptional value in the mid-range bracket—its digital temperature control and helping hands justify the extra investment over basic kits. For absolute beginners on tight budgets, the ANBES 60W offers surprising completeness without sacrificing essential features. The Hakko FX888D sits at the premium end but represents a tool you’ll never outgrow, making it ideal if you’re committed to electronics as a serious hobby or side business.
💬 Just one click — help others make better buying decisions too! 😊
Top 7 Soldering Kit for Beginners: Expert Analysis
1. ANBES 60W Adjustable Temperature Soldering Iron Kit
The ANBES 60W Kit stands out as the gateway drug for electronics beginners—and I mean that in the best possible way. With its ceramic heating core reaching operational temperature in under 15 seconds, you’re not left waiting and watching your motivation evaporate while the iron heats up. The adjustable temperature range from 200°C to 450°C means you’re equipped to handle both delicate circuit board work and heavier wire connections without needing to upgrade immediately.
What separates this from cheaper alternatives is the practical completeness of the package. You get five interchangeable soldering tips covering different job requirements, a desoldering pump that actually creates decent suction (many budget kits fail here), and a proper stand with cleaning sponge. The inner-heated ceramic technology provides consistent temperature stability—crucial when you’re learning, because inconsistent heat is what creates those frustrating cold joints that look terrible and fail quickly. Based on extensive customer feedback, users particularly appreciate the on/off switch feature, which extends tip life by letting you power down during breaks rather than letting it idle at temperature for extended periods.
For beginners specifically, this kit removes common learning obstacles. The ergonomic handle stays cool enough to grip comfortably even after 30 minutes of continuous use, and the included wire stripper/cutter means you’re not making extra tool purchases right away. Customer reviews consistently mention successfully tackling their first guitar electronics modifications, LED strip repairs, and basic Arduino projects with this setup.
Pros:
✅ Fast 15-second heat-up saves beginner patience
✅ Complete accessory package eliminates additional purchases
✅ On/off switch extends tip lifespan significantly
Cons:
❌ Temperature dial lacks precise markings between settings
❌ Solder wire quality could be better for lead-free work
The ANBES typically runs in the $25-35 range, positioning it as exceptional value for anyone testing the waters before committing to pricier professional equipment.
2. Tabiger 15-in-1 Soldering Iron Kit
The Tabiger 15-in-1 takes a maximalist approach—throw in everything a beginner might possibly need and let them figure out what they actually use. This 60W soldering iron kit includes not just the basics but also extras like electronic wire, a wire stripper, and a genuinely useful PU carrying case that keeps everything organized between projects. What most buyers don’t appreciate until they’ve lived with it is how the carrying case transforms this from a desk-cluttering collection of parts into a grab-and-go repair kit you can take to a friend’s house or workspace.
The ceramic heating element reaches temperature quickly, and the five interchangeable tips cover most beginner scenarios—from precision PCB work to larger wire connections. The desoldering pump operates with one hand, which sounds minor until you’re holding a board with one hand and trying to remove a component with the other. Customer feedback highlights that hobbyists working on guitar wiring, basic electronics repairs, and jewelry soldering find this kit handles their needs without feeling limited. The Y-style iron stand provides stable parking, and the anti-static tweezers show attention to protecting sensitive components.
Where this kit particularly shines is in the home DIY context. If you’re the person who fixes broken appliances, repairs cable connections, or builds small electronics projects as occasional needs arise rather than as a dedicated hobby, the Tabiger provides everything without the premium price of professional stations. Users report successful repairs on everything from TV capacitors to children’s toy electronics.
Pros:
✅ Comprehensive accessory selection reduces additional purchases
✅ Portable carrying case enables mobile repairs
✅ One-handed desoldering pump improves workflow efficiency
Cons:
❌ Iron handle runs slightly lighter, may feel unbalanced
❌ Temperature adjustment less precise than digital alternatives
Price-wise, the Tabiger typically lands in the $30-40 range, making it a solid middle-ground option for hobbyists who value completeness.
3. YIHUA 926 III Digital Display Soldering Station
The YIHUA 926 III represents where beginner equipment transitions into serious learning tools. This 60W digital soldering station features PID temperature stabilization—which means the station actively monitors and adjusts power to maintain your set temperature regardless of heat loss to your work. For beginners, this translates to consistent results instead of the temperature drop-recovery cycle that plagues simpler irons when you apply the tip to larger metal surfaces.
What elevates this station above simple kits is the integrated workspace design. Two helping hands with alligator clips mount directly to the station base, holding circuit boards steady without requiring separate clamps or third-hand tools. The detachable solder wire bracket keeps your solder right where you need it, and the rear mesh panel includes storage slots for the six included soldering tips. This compact integration means you’re setting up a complete soldering workspace, not just buying a heated stick.
The digital temperature display shows real-time readings from 194°F to 896°F with easy Celsius/Fahrenheit conversion. The sleep mode feature—adjustable to 5, 10, or 30 minutes—automatically reduces tip temperature during idle periods, significantly extending tip life. For learning to solder, this matters because you’re not rushing to complete joints before your iron times out, but you’re also not burning tips while reading instructions or planning your next move. Customer feedback from electronics students and serious hobbyists emphasizes the station’s reliability over extended use, with many reporting daily use for months without issues.
The YIHUA comes with lead-free solder wire, a desoldering pump, ESD-safe tweezers, and a cleaning sponge. Users working on electronics repair skills, LED programming kit projects, and circuit board design kit work report that this station handles everything from delicate surface-mount work to heavier through-hole soldering without limitations.
Pros:
✅ PID temperature stabilization prevents temperature fluctuations
✅ Integrated helping hands eliminate need for separate tools
✅ Adjustable sleep mode balances tip longevity with convenience
Cons:
❌ Larger footprint requires more desk space than simple irons
❌ Learning curve for menu navigation initially confusing
The YIHUA 926 III typically retails in the $65-85 range, positioned as the best value in the mid-tier segment for committed beginners.
4. Weller WLC100 Soldering Station
The Weller WLC100 brings legendary brand reputation to the beginner market. This 40W analog soldering station has been a workshop staple for decades, and that longevity tells you something important—it works reliably enough that people don’t feel compelled to upgrade. The variable power control dial lets you adjust from 5W to 40W, giving you temperature control without the digital complexity that some beginners find intimidating.
What makes the WLC100 particularly beginner-friendly is its simplicity. Turn the dial, wait for heat-up, start soldering. No menus to navigate, no calibration procedures, no password protection to forget. The ST3 iron-plated copper tip reaches temperatures up to 900°F and maintains decent temperature stability for an analog system. The cushioned foam grip handle stays comfortable during extended sessions, and the heavy-duty base prevents tipping—crucial when you’re learning and might knock things around.
Customer reviews from beginners emphasize the WLC100’s forgiving nature. If you’re inconsistent with your technique early on, the gradual temperature adjustment helps you find the sweet spot for different materials without the binary “perfect or disaster” feeling of fixed-temperature irons. Users report successfully completing their first PCB repairs, cable soldering, and basic electronics projects with minimal frustration. The durability is exceptional—many users inherit these from relatives or pick them up used, with units still performing after 15+ years of occasional use.
The downside is the 40W power limit. For heavy ground plane soldering or larger wire gauges, you’ll max out the capacity. But for typical beginner projects—Arduino work, electronics repair skills development, and learning to solder on standard components—it provides adequate power.
Pros:
✅ Legendary Weller durability ensures long-term reliability
✅ Analog simplicity reduces learning curve intimidation
✅ ST3 tips last years with proper maintenance
Cons:
❌ 40W power ceiling limits heavy-duty applications
❌ No direct temperature readout requires guesswork
The Weller WLC100 typically sells in the $40-50 range, offering brand-name quality at entry-level pricing.
5. Hakko FX888D Digital Soldering Station
The Hakko FX888D is what you buy when you know you’re serious about electronics and don’t want to upgrade later. This 65W digital soldering station represents professional-grade equipment that beginners can grow into, rather than grow out of. The ceramic heating element reaches 300°F in under one minute and maintains temperature stability that simpler irons can’t match—this station heats up quickly and maintains consistent temperature for extended periods, making it well-suited for big projects requiring prolonged soldering.
What separates the FX888D from budget alternatives is the precision of its temperature control system. The digital display shows exact temperatures from 120°F to 899°F, and the station maintains that setting within tight tolerances regardless of thermal load. When you touch your tip to a large ground plane or heavy component lead, cheaper irons show noticeable temperature drop and recovery time. The Hakko compensates so quickly that you won’t notice unless you’re specifically testing for it. This consistency means your solder flows the same way every time, eliminating one major variable while you’re learning proper technique.
The password protection feature prevents accidental temperature changes—useful in shared workspaces or households with curious kids. The included brass wire tip cleaner maintains tip cleanliness without the temperature drop caused by wet sponges. Customer feedback from both beginners and professionals emphasizes the station’s reliability over years of use, with many reporting daily operation without failures or degradation in performance.
For beginners specifically, the FX888D offers peace of mind. You’re investing in a tool that won’t become your bottleneck as your skills advance. Users working on Arduino advanced projects, electronic music synthesizer kit building, and professional repair work report this station handles everything from tiny surface-mount components to larger cable assemblies without strain.
Pros:
✅ Professional-grade temperature stability ensures consistent results
✅ Extensive replacement tip selection enables specialization
✅ Password protection prevents unauthorized setting changes
Cons:
❌ Premium pricing requires upfront commitment
❌ Menu navigation requires manual consultation initially
The Hakko FX888D typically runs in the $95-120 range, positioned as a buy-once-cry-once investment for serious learners.
6. Plusivo 60W Soldering Iron Kit
The Plusivo 60W Kit carves out its niche with thoughtful inclusion of accessories that other budget kits skip. Beyond the standard soldering iron, tips, and stand, this kit includes heat-shrink tubing—something you’ll need for almost every practical project but often forget to buy separately. The pen-style screwdriver with seven magnetic bits addresses another common beginner frustration: opening devices for repair, then realizing you don’t have the right bit to access internal components.
The 60W soldering iron features ceramic heating and adjustable temperature from 392°F to 842°F, providing adequate range for both delicate and heavy-duty work. The storage bag shows better build quality than typical bundled cases, with reinforced construction that actually protects your tools during transport rather than just collecting them. The heat-resistant cap that fits over the tip while still warm addresses a specific pain point—you can pack up immediately after finishing work instead of waiting 15-20 minutes for cooling.
Customer feedback emphasizes this kit’s value for beginners who plan to work on varied projects. The inclusion of both lead and lead-free solder wire lets you experiment with both types to understand their different flow characteristics. Users report successful completion of circuit board repairs, cable assembly work, and basic electronics repair skills development using this complete package.
Pros:
✅ Heat-shrink tubing inclusion saves additional purchases
✅ Pen screwdriver set enables complete device repairs
✅ Quick-cooling cap allows immediate storage
Cons:
❌ Solder wire quality adequate but not exceptional
❌ Iron tip temperature calibration less precise than digital stations
The Plusivo typically retails in the $30-40 range, competing directly with other value-oriented complete kits.
7. X-Tronic 3020-XTS Digital Soldering Station
The X-Tronic 3020-XTS enters the conversation when you want professional features without Hakko pricing. This 75W digital LED display soldering station provides the highest power output in this comparison, making it the go-to choice for beginners planning heavier-duty work alongside typical electronics projects. The two helping hands with alligator clips and magnifying glass mount to the base, creating an integrated workspace that simplifies setup.
The LED display shows precise temperature control with both Celsius and Fahrenheit options. The 75W heating capacity means faster heat-up times and better recovery when working with thermal-sinking components like large connectors or ground planes. For learning to solder, this extra thermal capacity provides forgiveness—you’re less likely to create cold joints because the iron couldn’t keep up with heat demand. The included solder roll holder keeps your solder accessible without tangling.
Customer reviews from beginners working on varied projects emphasize the station’s versatility. Users report successfully tackling everything from delicate LED strip connections to heavier automotive wire repairs with the same equipment. The brass wire sponge and conventional wet sponge give you cleaning options based on tip condition and temperature management needs.
Pros:
✅ 75W power handles heavy-duty applications
✅ Integrated magnifying glass aids precision work
✅ Complete accessory package includes dual cleaning options
Cons:
❌ Power cord could be longer for workspace flexibility
❌ Helping hands arms shorter than premium standalone units
The X-Tronic 3020-XTS typically sells in the $75-95 range, positioned as feature-rich value in the mid-to-upper tier.
✨ Don’t Miss These Exclusive Deals!
🔍 Take your electronics skills to the next level with these carefully selected products. Click on any highlighted item to check current pricing and availability. These tools will help you create authentic connections your projects deserve!
From Frustration to Mastery: Real-World Success Timeline
Most beginners approach their first soldering kit for beginners expecting an instant learning curve, then hit reality hard when their first joints look terrible. Here’s what actually happens when you follow a structured approach rather than hoping skills materialize through osmosis.
Week 1: Foundation Building (Days 1-7)
Your first week focuses on understanding heat transfer, not creating perfect joints. Practice on scrap wire and old circuit boards—learning to recognize proper wetting (when solder flows smoothly across surfaces) versus beading (when it balls up, indicating insufficient heat or dirty surfaces). Temperature matters enormously here: too cold creates lumpy, weak joints; too hot damages components. Most beginners using the YIHUA 926 III or Hakko FX888D find their sweet spot around 350-370°C for lead-free solder on typical components.
Week 2-3: Technique Refinement (Days 8-21)
Now you’re moving beyond random experiments to methodical practice. The three-second rule becomes your mantra: apply heat to both the pad and component lead for two seconds, apply solder for one second, remove everything. Joint should flow, not ball. During this phase, you’ll discover why helping hands and proper lighting matter—trying to hold a board, apply the iron, feed solder, and see what you’re doing simultaneously without assistance leads to shaky, inconsistent results.
Week 4-6: Confidence Building (Days 22-42)
This is where frustration transforms into competence. You’re now completing actual projects—repairing broken cable connections, building simple LED circuits, assembling Arduino shields. Your success rate climbs from 60% acceptable joints to 90%+. The temperature stability of quality equipment pays dividends here; inconsistent irons force you to compensate for tool deficiencies rather than just focusing on technique improvement.
Users working on circuit board design kit projects or electronics repair skills development report that by week six, they’re confidently tackling repairs they would have previously sent to professionals. The key insight? Consistent practice with proper equipment creates muscle memory faster than sporadic sessions with inadequate tools.
How to Choose Your First Soldering Kit for Beginners
Prioritize Temperature Control Over Wattage
New buyers obsess over wattage numbers—60W versus 40W versus 80W—when they should focus on temperature control precision. A 40W iron with accurate temperature regulation outperforms an 80W iron that swings wildly between settings. Look for adjustable temperature from at least 200°C to 450°C, covering both delicate electronics work and heavier connections. Digital displays provide better feedback than analog dials, but analog systems like the Weller WLC100 work fine if you’re willing to learn by feel.
Complete Kits Beat Piecemeal Purchases
Buying individual components always costs more and delays your start. A complete soldering kit for beginners should include multiple tip sizes (not all the same shape), a stand with tip cleaning capability, helping hands or a third-hand tool, and desoldering equipment. The price difference between bare-bones and complete kits is often just $10-15, but the convenience gap is enormous. Consider: would you rather spend your first hour soldering or your first hour driving to hardware stores tracking down missing accessories?
Budget Allocation Strategy
Entry-level adequate: $25-40 (ANBES, Tabiger, Plusivo)
Mid-tier recommended: $60-85 (YIHUA 926 III, X-Tronic)
Professional-grade: $95-120+ (Hakko FX888D, Weller WE1010)
The mid-tier sweet spot exists around $70-80, where you get digital temperature control, helping hands, and professional-quality tips without the premium brand markup. If budget constraints force you lower, prioritize temperature adjustability over accessory quantity—you can buy tweezers later, but learning with wildly inconsistent temperature creates bad habits.
Tip Compatibility and Availability
Standard tip formats (900M series, T18 series) ensure you can find replacements anywhere. Proprietary tip designs might offer advantages but create long-term supply chain dependence. Research whether your chosen iron uses common tip standards—this seemingly minor detail becomes crucial when you need a specialty tip for a specific project and can’t source one.
Power Supply Considerations
Corded models dominate the beginner market for good reason—consistent power delivery without battery anxiety. Cordless options exist (ANBES offers a rechargeable version) but typically trade power consistency for mobility. Unless you specifically need portability for mobile repairs, stick with corded models for your primary learning tool.
Soldering Safety Tips: Beyond the Obvious
Everyone knows “don’t touch the hot end,” but real soldering safety tips extend deeper. The fumes you’re breathing while learning to solder contain flux residues and vaporized metals—prolonged exposure to soldering fumes can cause health issues ranging from moderate to severe. Work near a window with cross-ventilation or invest in a small USB fume extractor (under $30) that sits beside your workspace. Your future lungs will thank you.
Thermal Hazards Beyond Burns
Soldering irons operate at 300-400°C, but the real danger isn’t direct contact—it’s forgetting they’re hot and brushing against them while reaching for tools. Develop the habit of placing the iron in its stand after every single joint, not just when taking breaks. Most beginner accidents happen during that moment of distraction between solder joints.
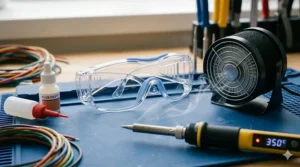
Eye Protection Matters More Than You Think
Solder occasionally spits or pops, sending tiny molten droplets airborne. Safety glasses aren’t paranoia—they’re insurance against the one-in-a-thousand incident that could permanently damage your vision. Magnifying glasses with built-in LED lighting (included with the X-Tronic station) serve double duty: better work visibility plus splash protection.
Workspace Fire Prevention
Soldering irons can ignite paper, plastics, fabrics, and wooden surfaces in seconds. Use a silicone mat or dedicated soldering workspace—never work on flammable surfaces. Keep a small fire extinguisher nearby, not in another room. The ten seconds saved by not walking to grab it could mean the difference between a small scorch mark and a house fire.
Lead Solder Considerations
Despite health concerns, lead solder (60/40 tin-lead) remains easier for beginners—lower melting point, better flow, more forgiving. If you choose lead solder, never eat at your workspace, wash hands thoroughly after sessions, and absolutely avoid contact if you’re pregnant or around young children. Lead-free alternatives exist for a reason, even though they demand slightly higher temperatures and less forgiving technique. For detailed guidance on solder selection, Techspray’s Ultimate Guide to Electronic Soldering provides industry-standard recommendations on choosing between lead and lead-free options.
Electronics Repair Skills: Building Your Knowledge Base
Starting with a soldering kit for beginners is just the entry point—true electronics repair skills require understanding what you’re actually doing beyond “heating metal until it melts.” The bridge between “can solder” and “can repair electronics” involves learning component identification, circuit function, and troubleshooting methodology.
Component Recognition Before Replacement
That charred resistor on your circuit board—is it 100 ohms or 1k ohms? Color codes and SMD markings become your language. Before you can repair anything, you need to identify what failed and what specification replacement you need. Resources like SparkFun’s comprehensive soldering tutorial and Wikipedia’s extensive electronics entries provide free education that transforms you from parts-swapper to actual technician.
From Soldering to Circuit Understanding
Replacing a broken capacitor means nothing if you don’t understand what capacitors do in your circuit. Free online resources from educational institutions and electronics communities teach circuit theory without requiring formal education. Sites like AllAboutCircuits.com and the EEVblog forums host thousands of experienced technicians willing to explain concepts to beginners.
Desoldering: The Overlooked Essential
Half of electronics repair involves removing components before replacing them. Desoldering pumps (included in most kits) work adequately for through-hole components, but surface-mount desoldering requires different techniques. Learning proper heat application to avoid lifting pads or damaging traces separates successful repairs from boards destined for the recycling bin.
Tool Ecosystem Beyond Soldering
A multimeter becomes your next essential purchase—testing continuity, measuring voltages, and identifying short circuits are fundamental diagnostic skills. Logic analyzers, oscilloscopes, and signal generators come later, but that $20 multimeter unlocks actual troubleshooting capability versus guessing which component failed.
Circuit Board Design Kit and Arduino Advanced Projects
The same soldering kit for beginners that repairs broken devices also enables creation. Circuit board design kit work and Arduino advanced projects transform you from consumer to creator, using identical fundamental skills with different applications.
From Kit Assembly to Custom Designs
Arduino shields and breakout boards provide structured learning—you’re following instructions, placing components, and seeing immediate results. This builds confidence before tackling custom circuit board design kit projects where you’re creating from scratch. The soldering technique remains identical; only the planning and design phases change.
Surface-Mount Progression
Through-hole components (with wire leads that go through the board) dominate beginner kits, but modern electronics increasingly use surface-mount devices (SMD). Your YIHUA or Hakko station handles both—0805 and 1206 SMD resistors and capacitors are surprisingly beginner-friendly with proper technique, despite intimidating appearance. Drag soldering IC pins looks difficult but becomes routine with practice.
Project Complexity Ladder
Month 1: Blinking LED circuits
Month 2: Arduino sensor projects
Month 3: Audio amplifiers and power supplies
Month 4: Microcontroller programming with custom PCBs
Month 5: LED programming kit projects and addressable lighting
Month 6: Electronic music synthesizer kit assembly
This progression matches natural skill development—each level introduces new challenges while reinforcing fundamentals. Pushing too fast leads to frustration; advancing too slowly breeds boredom. Match your project difficulty to your current capability plus one new technique.
Common Mistakes to Avoid
Skipping the Tinning Step
Every soldering session should begin by tinning your tip—coating it with fresh solder before starting work. This protects the tip from oxidation and ensures better heat transfer. Beginners often skip this, wondering why their iron won’t melt solder properly despite adequate temperature. The National Aviation Academy’s essential soldering tips emphasize that proper tip maintenance—including regular tinning—prevents most common beginner frustrations.
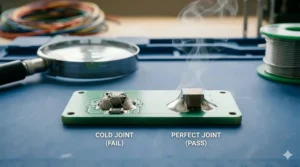
Using Too Much or Too Little Solder
Good solder joints have a shiny finish with just enough solder coverage; cold joints appear matte and weak, while excessive solder increases breaking risk. The sweet spot comes from experience, but generally: use enough solder to cover the pad and surround the component lead without creating a blob. More isn’t better—it’s just wasteful and potentially problematic.
Rushing Before Reaching Temperature
Your iron’s LED turns green or reaches set temperature, but that doesn’t mean the tip is ready. Give it an extra 30 seconds to fully stabilize before starting. Impatient beginners apply heat to components before the iron is truly ready, creating cold joints because they’re chasing proper flow with an inadequately heated tool.
Neglecting Flux Application
Your solder wire includes flux core, but sometimes you need additional flux—especially when desoldering or reworking old joints. A $5 flux pen saves countless headaches by improving solder flow and preventing dry joints. Most soldering safety tips warn about flux fumes, but used properly, it’s essential to quality work.
Ignoring Tool Maintenance
Cleaning your tip regularly during use isn’t optional—it’s mandatory for consistent results. Oxidized tips turn black, won’t accept solder, and transfer heat poorly. A few seconds of tip maintenance after every 3-4 joints prevents 15 minutes of frustration trying to clean heavily oxidized tips later.
LED Programming Kit and Project Ideas
Your new soldering skills unlock a universe of LED programming kit projects that combine hardware assembly with creative expression. Addressable RGB LEDs (WS2812B “NeoPixels”) have revolutionized DIY lighting, making professional-looking effects accessible to beginners with basic soldering capability.
Starter LED Projects
Begin with simple through-hole LED circuits—resistor calculation, proper polarity, and basic soldering. Progress to LED strips requiring power connections and data lines. The soldering itself is straightforward, but you’re learning current calculations, voltage drops, and power distribution—skills that transfer across all electronics work.
Addressable LED Complexity
Individual control of hundreds of LEDs creates mesmerizing effects, but power management becomes critical. Each RGB LED can draw 60mA at full brightness—a 100-LED strip potentially needs 6 amps. Your soldering kit for beginners handles the connections; your growing electronics knowledge calculates power requirements and prevents burnout.
Integration with Arduino and Microcontrollers
LED programming kit work naturally pairs with Arduino advanced projects. You’re soldering connections, then writing code to create custom animations, color patterns, and interactive lighting that responds to sensors. This combination of hardware and software skills defines modern maker culture.
Practical Applications
Beyond aesthetics, LED projects solve real problems: under-cabinet lighting, vehicle accent lights, PC case illumination, holiday decorations, cosplay props, and art installations. Each application teaches different aspects of circuit design, power management, and user interface considerations while reinforcing fundamental soldering technique.
❓ Frequently Asked Questions
❓ What temperature should I set my soldering iron for beginners?
❓ Can I use a soldering kit for beginners on surface mount components?
❓ How long does it take to learn proper soldering technique?
❓ Is lead-free solder harder to work with for beginners?
❓ What size solder wire should beginners buy?
Conclusion: Your Soldering Journey Starts Now
The right soldering kit for beginners eliminates frustration that makes people quit before developing skills. Whether you choose the budget-friendly ANBES 60W Kit, the feature-rich YIHUA 926 III, or the professional-grade Hakko FX888D, you’re investing in capability that transforms you from consumer to creator. Each kit reviewed here provides the essential tools—what you do with them depends entirely on your commitment to practice and learning.
Remember that electronics repair skills and circuit understanding develop alongside soldering technique. Your first joints will be imperfect, your first projects will have mistakes, and you’ll occasionally damage components through improper technique. This is normal. Every expert began exactly where you are now, producing inconsistent joints and questioning whether they’d ever “get it.” The difference between those who master soldering and those who quit isn’t natural talent—it’s persistence through the awkward learning phase when everything feels difficult.
Start with simple projects: repair broken cables, replace worn connectors, assemble beginner Arduino shields. Build confidence before tackling complex circuit board design kit work or electronic music synthesizer kit assembly. Join online communities where experienced makers answer questions and troubleshoot problems. Watch tutorial videos showing proper technique from multiple perspectives. Most importantly, actually practice—reading guides and watching videos don’t build muscle memory; hands-on repetition does.
The investment you’re making isn’t just in tools—it’s in self-sufficiency. Future you won’t discard electronics because one component failed. Future you will modify devices to fit specific needs. Future you will create custom solutions to problems mass-market products don’t address. That transformation starts with choosing your first soldering kit for beginners and committing to the learning process.
Recommended for You
- 7 Best Professional Watercolor Sets That Transform Your Art in 2026
- 7 Best Revell Model Kits for Beginners 2026
- 7 Best Marvel Action Figures for Kids 2026
Disclaimer: This article contains affiliate links. As an Amazon Associate, I earn from qualifying purchases. If you purchase products through these links, we may earn a small commission at no additional cost to you.
✨ Found this helpful? Share it with your friends! 💬🤗