
In This Article
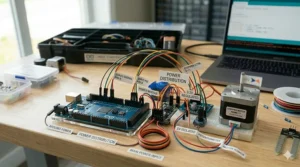
Picture this: you’re staring at a jumble of wires, sensors, and circuit boards, wondering where on earth to begin. I’ve been there, and honestly? That confusion is exactly where your electronics journey should start. An arduino mega starter kit transforms that chaos into your personal playground for innovation.
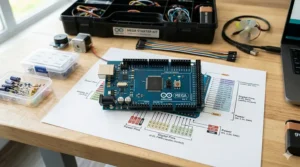
The Arduino Mega 2560 isn’t just another microcontroller board—it’s your ticket to building everything from weather stations to robotic arms. With 54 digital I/O pins and 16 analog inputs, it leaves the standard Uno in the dust. Whether you’re a curious teen diving into 3d printing pen for teens projects or an educator championing maker education in your classroom, the right starter kit makes all the difference between frustration and breakthrough moments.
What makes the Mega special? Think of it as the Swiss Army knife of Arduino boards. Those extra pins mean you can connect more sensors, control more motors, and build more complex projects without running out of connections. I’ve watched countless beginners transform from “I can’t even blink an LED” to “look at my autonomous robot” in just weeks with the right kit and determination.
Quick Comparison Table
| Product | Components | Price Range | Best For | Rating |
|---|---|---|---|---|
| ELEGOO Mega R3 Ultimate Kit | 200+ | $65-75 | Comprehensive learning | ⭐⭐⭐⭐⭐ |
| SunFounder Vincent Kit | 291 | $55-65 | Advanced projects | ⭐⭐⭐⭐⭐ |
| GAR Monster Kit | 100+ (5 boards) | $85-95 | Multi-board projects | ⭐⭐⭐⭐½ |
| REXQualis Complete Kit | 200+ | $50-60 | Budget-friendly | ⭐⭐⭐⭐ |
| LAFVIN Project Kit | 60+ | $45-55 | Beginners | ⭐⭐⭐⭐ |
| SunFounder Super Starter | 250+ | $45-55 | Scratch programming | ⭐⭐⭐⭐½ |
| ELEGOO Basic Mega Kit | 100+ | $35-45 | Essential learning | ⭐⭐⭐⭐ |
💬 Just one click – help others make better buying decisions too! 😊
Top 7 Arduino Mega Starter Kit Options: Expert Analysis
1. ELEGOO Mega R3 Project The Most Complete Ultimate Starter Kit
The ELEGOO Mega R3 Project Kit isn’t messing around with its 200+ component arsenal. This powerhouse bundle includes everything from basic LEDs to advanced modules like the 74HC595 shift register, making it perfect for both hands-on electronics learning and serious experimentation.
Key Specifications:
- MEGA 2560 R3 controller board (100% Arduino-compatible)
- LCD1602 display with I2C interface
- Complete motor control system with relays
- Over 200 individual components including sensors, LEDs, and passive components
Priced around $65-75, this kit delivers exceptional value. Customer feedback consistently praises the detailed 33-lesson tutorial that walks you through everything from basic LED control to complex sensor integration. One reviewer mentioned transforming their classroom with this kit, noting how students who struggled with traditional programming suddenly lit up when they could see their code controlling physical objects.
Pros:
✅ Comprehensive tutorial with 33 projects
✅ Organized component box included
✅ Premium quality components with low failure rate
Cons:
❌ Can be overwhelming for absolute beginners
❌ Tutorial CD requires computer with optical drive
2. SunFounder Ultimate Starter Kit (Vincent Kit) for Arduino Mega 2560
Talk about going all-in—the SunFounder Ultimate Starter Kit packs a staggering 291 components that’ll keep you busy for months. This isn’t just a starter kit; it’s practically a complete electronics laboratory in a box, perfect for those serious about Arduino projects for beginners who want room to grow.
Key Specifications:
- Mega 2560-compatible development board
- 73 complete lessons (51 in C, 22 in Scratch)
- Multiple display options including LCD and OLED screens
- Advanced sensors for robotics and IoT projects
At $55-65, the Vincent Kit represents outstanding bang for your buck. The dual-language approach (C and Scratch) makes it incredibly versatile for different learning styles. Parents love that their kids can start with visual Scratch programming before diving into text-based coding. The online tutorials are continuously updated—no more dusty CD manuals that become obsolete.
Pros:
✅ Massive component selection for endless creativity
✅ Dual programming language support
✅ Continuously updated online resources
Cons:
❌ Requires significant storage space
❌ Can take weeks to explore all features
3. GAR Monster Starter Kit (5-Board Multi-Platform Bundle)
The GAR Monster Starter Kit is the overachiever of Arduino bundles. With five different boards—Uno R3, Mega 2560, Nano V3, ESP32, and ESP8266—you’re not just learning Arduino; you’re mastering multiple platforms simultaneously. Think of it as the electronics project kit that grows with your ambitions.
Key Specifications:
- Five Arduino-compatible boards for diverse projects
- 25+ sensor modules including RFID and gyroscope
- Wireless modules (Wi-Fi, Bluetooth, RF transceivers)
- Comprehensive toolbox organization system
Priced at $85-95, this kit costs more but delivers unmatched versatility. The inclusion of ESP32 with built-in Wi-Fi and Bluetooth opens doors to IoT projects that standard kits can’t touch. One maker shared how they built a complete smart home system using just this kit’s components, from door sensors to environmental monitoring.
Pros:
✅ Multiple board platforms in one package
✅ IoT-ready with wireless capabilities
✅ Excellent component organization
Cons:
❌ Higher price point
❌ Learning curve spans multiple architectures
4. REXQualis Most Complete Starter Kit Base on Arduino MEGA 2560
The REXQualis Complete Starter Kit strikes that sweet spot between comprehensive and approachable. With 200+ components carefully selected for educational value, it’s become a favorite in both homeschool and traditional classroom settings where solar panel experiment kit concepts meet practical electronics.
Key Specifications:
- Mega 2560 board with expansion shield
- RFID RC522 module for authentication projects
- Complete LCD and LED matrix displays
- Detailed tutorial covering sensor principles
At $50-60, REXQualis delivers serious value without cutting corners on quality. Teachers particularly appreciate the clear explanations of working principles—not just “do this,” but “here’s why it works.” The kit’s focus on practical applications means students quickly move from blinking LEDs to building useful devices like security systems and environmental monitors.
Pros:
✅ Excellent price-to-component ratio
✅ Strong emphasis on understanding principles
✅ Perfect for classroom bulk purchases
Cons:
❌ Slightly less components than premium kits
❌ Some users report occasional component defects
5. LAFVIN Project Super Starter Kit for R3 Mega2560
Don’t let its modest component count fool you—the LAFVIN Project Super Starter Kit focuses on quality over quantity. With 60+ carefully curated components, it strips away the overwhelming excess and concentrates on what beginners actually need for their first dozen projects.
Key Specifications:
- Mega 2560 compatible board
- 8×8 LED matrix for visual displays
- I2C LCD module requiring only 2 pins
- Focus on fundamental electronics concepts
Priced at $45-55, LAFVIN offers exceptional accessibility for budget-conscious learners. The streamlined component selection means you’ll actually use everything instead of leaving half the kit gathering dust. Parents of teens experimenting with drone building kit concepts appreciate how quickly their kids can achieve visible results without getting lost in complexity.
Pros:
✅ Budget-friendly entry point
✅ Focused component selection
✅ Faster path to first successful project
Cons:
❌ Limited components for advanced projects
❌ May need expansion for complex builds
6. SunFounder Project Super Starter Kit with 2560 Board
The SunFounder Project Super Starter Kit brings 250+ components with a brilliant twist—it includes both traditional C programming and visual Scratch coding. This dual approach makes it exceptionally suited for families where multiple skill levels want to explore electronics together, bridging maker education gaps effortlessly.
Key Specifications:
- Mega 2560 R3 compatible development board
- 42 complete projects (23 C, 19 Scratch)
- Motors and ultrasonic modules included
- Interactive graphical programming support
At $45-55, this kit punches well above its price class. The Scratch integration is genuinely innovative—kids as young as 10 can program the hardware using drag-and-drop blocks, then graduate to C code when ready. One homeschool mom shared how her 12-year-old started with Scratch and was writing C code within three months, something she never imagined possible.
Pros:
✅ Smooth learning curve from visual to text coding
✅ Extensive component variety
✅ Excellent online tutorial platform
Cons:
❌ Scratch requires internet connection
❌ Advanced users may skip beginner lessons
7. ELEGOO Mega R3 2560 Project Starter Kit (Basic Edition)
Think of the ELEGOO Basic Mega Kit as the espresso shot version of their ultimate kit—concentrated, essential, and surprisingly powerful. With 100+ core components, it delivers enough to master fundamentals without the paralysis of endless options, making it ideal for those starting their hands-on electronics learning journey.
Key Specifications:
- Mega 2560 R3 controller board
- 16-lesson focused tutorial CD
- Essential sensors and displays
- Complete breadboard and jumper wire set
Priced at $35-45, this entry-level kit removes financial barriers to electronics education. The 16 focused lessons build logically from simple to complex, teaching core concepts without overwhelming detail. Students report feeling accomplished rather than frustrated, completing meaningful projects within the first week. It’s the perfect foundation before investing in more elaborate setups.
Pros:
✅ Lowest price point for genuine Mega kit
✅ Focused learning path
✅ Ideal for classroom sets on tight budgets
Cons:
❌ Limited advanced components
❌ May outgrow kit within 2-3 months
What is an Arduino Mega Starter Kit?
An arduino mega starter kit is a complete educational package containing an Arduino Mega 2560 microcontroller board along with essential electronic components, sensors, and learning materials designed to teach programming and circuit building. Unlike standalone boards, these kits provide everything needed to start creating interactive projects immediately, from basic LED circuits to complex robotics systems.
The Arduino Mega 2560 features 54 digital input/output pins and 16 analog inputs, making it significantly more capable than the standard Uno board. This expanded capacity proves crucial for ambitious projects requiring multiple sensors, displays, and motors working simultaneously. Think of it as upgrading from a studio apartment to a mansion—suddenly, you have room for everything you’ve been imagining.
According to Arduino Education, hands-on STEAM programs empower students through middle school, high school, and university levels, with starter kits serving as the foundation for this journey. The beauty lies in the all-in-one approach: no hunting for compatible parts, no voltage mismatches, no wondering if your jumper wires will fit your breadboard. Everything works together seamlessly because it’s designed that way.
Understanding Arduino Mega 2560 Architecture
The Mega 2560’s ATmega2560 microcontroller runs at 16MHz with 256KB of flash memory—quadruple the Uno’s capacity. This extra memory allows for longer, more complex programs without running into storage limitations. I’ve watched beginners hit the Uno’s ceiling within weeks, forcing frustrating code optimization. The Mega eliminates that roadblock entirely. Wikipedia notes that Arduino boards use a variety of microprocessors, with the Mega featuring one of the most capable chips in the standard lineup.
Those 54 digital I/O pins break down beautifully: 15 provide PWM (Pulse Width Modulation) output for precise motor control and LED dimming, while any can trigger interrupts for responsive programming. The 16 analog inputs read sensor values with 10-bit precision, perfect for temperature sensors, potentiometers, and light-dependent resistors. This architectural generosity means your imagination sets the limits, not the hardware.
Communication capabilities include four hardware serial ports (UART) instead of one, plus SPI and I2C interfaces. This matters tremendously when you’re juggling GPS modules, Bluetooth modules, and serial debugging simultaneously. The Uno forces you to choose; the Mega says “bring it all.” Real-world projects invariably need multiple serial devices, and the Mega handles them without breaking a sweat.
The board operates at 5V logic levels while accepting 7-12V input through its barrel jack, with 9V recommended for optimal regulation. This power flexibility means you can run your projects from USB during development, then switch to battery power for deployment. The onboard voltage regulator handles the conversion smoothly, protecting your components from voltage spikes.
Why Choose Arduino Mega Over Arduino Uno?
The pin count difference alone justifies the Mega for complex projects. Imagine building a robotic arm with six servo motors, an ultrasonic distance sensor, an LCD display, and LED status indicators. That’s 12+ connections minimum—impossible on an Uno with its 14 digital pins, but comfortable on the Mega with connections to spare. I’ve seen robotics teams abandon Uno-based designs mid-project when they realized they’d run out of pins.
Memory capacity becomes critical faster than beginners expect. Simple LED blink programs consume negligible space, but add WiFi libraries, sensor drivers, and display routines, and that 32KB Uno flash fills shockingly fast. The Mega’s 256KB lets you include debugging code, extensive comments, and even backup functions without obsessive optimization. Professional developers know that premature optimization wastes time—the Mega liberates you from that pressure.
Multiple serial ports transform complex projects from nightmares into manageable builds. Connect your GPS module to Serial1, Bluetooth to Serial2, your PC debugger to Serial (USB), and still have Serial3 available for future expansion. This architectural luxury eliminates software serial ports—those unreliable hacks that drop data under load. When your drone building kit needs simultaneous GPS, telemetry, and control signals, the Mega handles it elegantly.
Cost considerations deserve mention: yes, the Mega costs slightly more than an Uno. But consider the total project cost including sensors, motors, and displays. That extra $5-10 for the Mega board becomes negligible compared to the frustration of hitting hardware limits mid-project. Think of it as insurance against architectural regret—money exceptionally well spent.
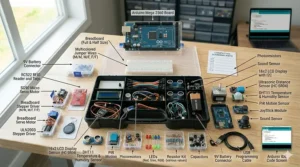
Essential Components in Quality Starter Kits
Premium kits distinguish themselves through breadboard quality and quantity. Look for 830-point solderless breadboards with solid power rails and tight connection points—cheap ones have loose contacts that create intermittent failures driving you insane. Quality kits include multiple breadboards or one large board with adequate space for complex circuits. Those extra holes matter when you’re connecting a dozen components simultaneously.
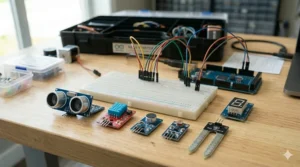
Sensor variety separates educational toys from serious learning tools. Expect temperature sensors (DHT11/DHT22), ultrasonic distance sensors (HC-SR04), photoresistors, infrared receivers, and motion sensors (PIR). These fundamental sensors appear in thousands of real-world applications, from smart thermostats to security systems. Hands-on practice with authentic components beats theoretical knowledge every time.
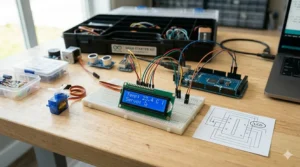
Display options reveal kit sophistication. Entry kits include basic LED arrays; better kits add LCD1602 character displays with I2C interfaces; premium kits throw in OLED screens and TFT displays. Why does this matter? Because visual feedback transforms abstract code into tangible results. Watching your program display text or graphics creates those “aha!” moments that cement understanding—pure dopamine for curious minds.
Motor control components indicate whether a kit supports robotics projects. Quality kits include servo motors for precise angular control, DC motors for wheels and fans, and stepper motors for accurate positioning. The L298N motor driver board handles heavy current loads safely, protecting your Mega from motor electrical noise. Without proper motor drivers, you’ll fry components trying to control anything more powerful than an LED.
Passive components form the foundation of all circuits: resistors, capacitors, diodes, and transistors. Premium kits provide these in organized storage with clear labeling—not thrown loose in a bag. Expect 10+ resistor values from 220Ω to 10kΩ, capacitors from 100nF to 1000µF, and assorted LEDs in multiple colors. These humble components enable everything from basic voltage division to complex filtering circuits.
Comparing Component Quality Across Brands
| Quality Factor | ELEGOO | SunFounder | REXQualis | LAFVIN |
|---|---|---|---|---|
| Component Durability | Excellent | Very Good | Good | Good |
| Tutorial Quality | Comprehensive | Outstanding | Good | Basic |
| Organization | Very Good | Excellent | Good | Fair |
| Documentation | Detailed | Extensive | Moderate | Limited |
Brand reputation matters more than beginners realize. ELEGOO has built a sterling reputation through consistent quality and responsive customer service. When a component arrives defective (it happens), they replace it promptly. SunFounder excels in documentation and online resources, updating tutorials to reflect current software versions—a detail competitors often neglect.
Component sourcing impacts reliability dramatically. Reputable brands source from established manufacturers; budget options may include no-name components with inconsistent specifications. That HC-SR04 ultrasonic sensor might work perfectly or return garbage data depending on its manufacturing quality. Quality brands test their components before packaging—your first project working on the first try instead of troubleshooting mystery failures.
PCB board quality affects both functionality and safety. Premium Mega clones use thicker copper traces and quality soldering that can handle repeated connections without lifted pads. Cheap boards develop connection issues after moderate use, creating intermittent failures that waste hours troubleshooting. The difference costs manufacturers pennies but saves users countless headaches.
Programming Languages and Learning Paths
Arduino projects for beginners traditionally start with C/C++ using the Arduino IDE—a simplified programming environment that hides complex details while remaining powerful enough for advanced work. The syntax proves approachable: digitalWrite(13, HIGH) turns on LED 13, period. No arcane initialization rituals or memory management headaches. This accessibility has introduced millions to programming who previously thought it beyond their reach.
Scratch-based programming opens electronics to even younger learners. Visual programming blocks snap together like digital LEGO, creating programs without typing syntax. “When button pressed, turn on LED” becomes a drag-and-drop operation instead of a typing exercise. This abstraction layer lets kids focus on logic and creativity rather than semicolons and brackets. The transition to text-based code happens naturally once they understand program flow.
Python support through platforms like MicroPython brings powerful libraries and modern syntax to microcontrollers. While not native to standard Arduino boards, the Mega 2560’s architecture can run Python interpreters with appropriate firmware. This opens doors for students already familiar with Python from computer science classes, reducing the learning curve when transitioning to hardware programming. The trade-off? Slightly slower execution compared to compiled C code.
Block-based environments like ArduBlock and mBlock bridge the gap between pure Scratch and raw C code. They generate Arduino C code from visual blocks, letting learners see the text equivalent of their visual programs. This transparency demystifies the compilation process—suddenly “oh, THAT’S what my blocks become!” Understanding deepens exponentially when you can peek under the hood.
Learning progression should follow a natural path: start with single LED control, advance to multiple LEDs in patterns, introduce button inputs, combine inputs and outputs, add sensors, integrate displays, control motors, and finally build complete systems. Each step adds one new concept, building confidence through incremental success. Jumping too far ahead creates frustration; progressing too slowly breeds boredom. Quality kits provide projects calibrated to this goldilocks zone.
Best Practices for Electronics Safety
Power management prevents most disasters. Never connect motors directly to Mega pins—they draw far more current than the 40mA per pin limit, potentially destroying the ATmega2560 chip. Use transistors or motor drivers as intermediaries, letting them handle heavy current while your Mega supplies low-power control signals. This separation protects expensive components from burnout.
Polarity matters critically with components like LEDs, electrolytic capacitors, and integrated circuits. LEDs have longer positive legs (anode); capacitors mark negative terminals; ICs have notched or dotted pin-1 indicators. Reversing polarity ranges from “doesn’t work” to “releases magic smoke.” Trust me, once you’ve smelled burning capacitors, you’ll double-check polarity religiously. Prevention beats replacement.
Static electricity can silently damage CMOS components, particularly in dry climates. Touch grounded metal before handling boards, avoid working on carpeted surfaces, and consider anti-static wrist straps for serious projects. The damage often doesn’t manifest immediately—components work initially then fail mysteriously weeks later. Professionals take ESD seriously; hobbyists should too.
Breadboard discipline prevents frustrating intermittent connections. Push wires fully into holes with firm pressure—partial connections work until they don’t, creating random failures that defy logic. Keep breadboards clean of debris and replace them when holes become worn. Consider the breadboard your circuit’s foundation; a shaky foundation dooms the entire structure.
Voltage compatibility protects both components and boards. The Mega operates at 5V logic, but many modern sensors require 3.3V. Connecting 5V to a 3.3V-only sensor damages it permanently. Use voltage dividers or level shifters as interfaces—simple resistor networks or dedicated IC chips that translate between voltage domains safely. Always verify component specifications before connecting.
Featured Snippet: How to Choose an Arduino Mega Starter Kit
- Assess Your Learning Goals – Identify whether you need basic electronics fundamentals, advanced robotics components, or IoT wireless capabilities before selecting components.
- Count the Components – Look for kits with 150+ items including diverse sensors, multiple display types, and both input/output devices for comprehensive learning.
- Evaluate Tutorial Quality – Ensure the kit includes detailed, step-by-step project guides with circuit diagrams and code explanations, preferably available online.
- Check Component Organization – Premium kits provide labeled compartment boxes that prevent lost parts and speed up project assembly significantly.
- Verify Arduino Compatibility – Confirm the board is 100% Arduino IDE compatible and includes the Mega 2560 specifically, not older or incompatible versions.
- Consider Your Budget – Balance cost against component quality and quantity; spending $50-70 typically provides better value than ultra-cheap $30 kits.
- Read Recent Reviews – Check 2025-2026 customer feedback for current quality issues, customer service responsiveness, and actual project success rates.
Building Your First Project: Getting Started
Unboxing your kit should feel like Christmas morning. Resist the urge to dive straight into complex projects—start with the absolute simplest example: the LED blink program. This “Hello World” of electronics teaches you the entire workflow: installing software, connecting hardware, uploading code, and verifying results. Master this loop before adding complexity.
The Arduino IDE installation (available at arduino.cc) takes minutes on Windows, Mac, or Linux. Download, run the installer, launch the program, and you’re ready. The interface remains deliberately simple: a text editor, a compile button, and an upload button. That’s 90% of what you’ll use initially. Complexity adds later when needed, not upfront where it intimidates.
Connecting your Mega via USB cable establishes both power and communication. Windows may require driver installation; the IDE walks you through this automatically. Select “Arduino Mega 2560” from the Tools > Board menu and the correct COM port from Tools > Port. Green LED on the board indicates power; blinking LED on pin 13 shows the pre-loaded test program running.
Your first custom program modifies the blink example. Open File > Examples > 01.Basics > Blink, change the delay values from 1000 to 500, click Upload, and watch your LED flash faster. Congratulations—you just modified and deployed firmware to a microcontroller. That sense of control, of bending hardware to your will through code? It’s addictive.
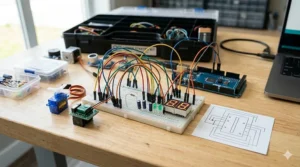
Circuit building starts with understanding breadboard mechanics. Power rails run vertically along sides (marked red and blue); numbered rows run horizontally with letters a-e and f-j connected internally. The center gap accommodates IC chips. Your first circuits will use the rows to connect components, the rails to distribute power, and jumper wires to bridge everything together.
Price Range and Value Analysis
| Budget Tier | Price Range | Component Count | Best For |
|---|---|---|---|
| Entry Level | $35-45 | 100-150 items | First-time learners, classroom sets |
| Mid-Range | $50-65 | 200-250 items | Serious hobbyists, homeschoolers |
| Premium | $70-95 | 250+ items | Advanced makers, multi-user families |
Budget kits ($35-45) provide adequate components for mastering fundamentals but may lack advanced sensors or multiple display options. They excel as introductions or classroom purchases where cost per student matters more than component variety. You’ll complete 15-20 meaningful projects before potentially wanting expansion modules—sufficient for most casual learners assessing their interest level.
Mid-range kits ($50-65) hit the sweet spot for serious learners planning extended engagement. The component variety supports dozens of projects without repetition, and quality levels rise noticeably. Better tutorials, organized storage, and responsive customer support justify the modest premium. This tier serves dedicated students, homeschool families, and hobbyists transitioning from beginner to intermediate skills.
Premium kits ($70-95) cater to advanced users or those wanting future-proof purchases. Multiple board types, extensive sensor arrays, and professional-grade components support years of exploration. The upfront cost looks steep until you calculate buying components individually—premium kits often include $150+ worth of parts. Smart shoppers recognize this value proposition, especially for families with multiple aspiring makers.
Hidden costs deserve consideration: replacement components (LEDs and resistors fail), expansion modules (WiFi shields, specialized sensors), and project materials (cardboard, glue, batteries). Budget an extra 20-30% beyond the kit price for these inevitable additions. Quality kits minimize failures, but learning involves occasional component casualties—it’s tuition paid in smoking resistors.
✨ Don’t Miss These Exclusive Deals!
🔍 Take your maker education to the next level with these carefully selected products. Click on any highlighted item to check current pricing and availability. These tools will help you create authentic electronics projects your whole family will love exploring together!
Troubleshooting Common Kit Issues
Upload failures frustrate beginners relentlessly, usually caused by incorrect board or port selection. Double-check Tools > Board shows “Arduino Mega 2560” and Tools > Port displays your USB connection (may show as CH340 or FTDI depending on USB chip). If the port doesn’t appear, try different USB cables—cheap ones sometimes carry power without data, rendering them useless for programming.
Component orientation trips up everyone initially. LEDs refuse to light when reversed; motors won’t spin without proper power connections; sensors return nonsense data when wired incorrectly. Circuit diagrams use standardized symbols—learn them early. Resistor color bands encode values: brown-black-red means 1000Ω (1kΩ). Mobile apps can read color codes via camera, eliminating guesswork.
Breadboard connection issues create intermittent failures—circuits work, then stop, then work again unpredictably. Push wires firmly and fully into holes, ensuring solid contact. Bent or corroded breadboard clips cause similar problems; replace worn breadboards rather than battling unreliable connections. Consider it preventive maintenance, not wasteful spending.
Power problems manifest in multiple ways: boards that won’t power on, projects that work via USB but fail on batteries, or random resets during operation. Check your power supply provides adequate current—the Mega draws up to 500mA, and your peripherals add more. A 1A power supply offers safe margin. Voltage sags cause mysterious resets; quality power supplies and fat power wires prevent this.
Library conflicts plague Arduino programming when multiple libraries define identical functions. Error messages like “redefinition of…” indicate this problem. Install one library version at a time, testing before adding more. The Arduino IDE’s Library Manager helps by tracking installed versions and suggesting updates. Keep libraries current but don’t update mid-project—inconsistencies creep in.
Integrating Arduino with STEM Curriculum
According to the U.S. Department of Education’s “YOU Belong in STEM” initiative, strengthening STEM education remains critical in preparing youth to solve complex problems and meet evolving workforce demands. Arduino platforms exemplify hands-on learning that makes abstract concepts tangible—students don’t just learn about voltage, they measure it; they don’t just study programming, they see code control real motors.
Research from the National Science Teaching Association shows that STEM education provides experiential learning where knowledge application occurs through authentic, relevant projects. Arduino kits transform classrooms into innovation labs where students tackle real problems rather than theoretical exercises. That shift from “why do we need to know this?” to “how can we build that?” revolutionizes engagement.
Cross-curricular applications extend beyond obvious science connections. Math classes calculate resistance values, current draws, and voltage divisions. Art students program LED matrices and displays, merging creativity with technology. History lessons explore technology evolution through hands-on builds of historical devices. English classes document projects through technical writing. Arduino becomes the thread connecting disparate subjects into cohesive understanding.
Assessment transforms from traditional tests to portfolio-based evaluation. Students document projects through build logs, troubleshooting notes, and final demonstrations. This authentic assessment reveals deeper understanding than multiple-choice questions ever could. Teachers witness problem-solving processes, collaborative skills, and persistence—qualities invisible in conventional testing but crucial for real success.
Advanced Projects Beyond the Basics
Home automation projects leverage the Mega’s extensive I/O for controlling lights, fans, and appliances via relay modules. Add ESP8266 WiFi modules for remote control through phone apps. Temperature sensors trigger fans automatically; light sensors adjust blinds—your imagination sets boundaries. These projects teach practical skills while creating genuinely useful systems, not toy demonstrations.
Robotics builds scale from simple wheeled platforms to sophisticated arms with gripper end-effectors. The Mega controls six servo motors easily, enabling humanoid robot arms with realistic movement. Combine ultrasonic sensors for obstacle detection, accelerometers for balance, and Bluetooth for remote control. These complex integrations teach systems thinking—how components interact within larger assemblies.
Data logging projects turn the Mega into a scientific instrument. Connect sensors measuring temperature, humidity, pressure, and light, then store readings to SD cards for analysis. Schools use these for environmental monitoring; hobbyists track greenhouse conditions; students conduct genuine scientific experiments with calibrated, timestamped data. This crosses from hobby into professional-grade instrumentation.
Musical instruments built with Arduino transform code into art. Piezo buzzers play simple melodies; PWM outputs drive larger speakers; MIDI libraries interface with synthesizers and computers. Students learn signal processing, frequency relationships, and timing precision while creating instruments they actually play. The intersection of technology and creativity sparks interest in unexpected ways.
Community Resources and Continued Learning
The Arduino community spans millions globally, creating inexhaustible learning resources. Arduino.cc hosts official tutorials, forums, and project galleries showcasing user creations from around the world. When you’re stuck, someone else has likely solved that exact problem—search the forums before despairing. Community culture emphasizes helping newcomers rather than gatekeeping knowledge.
YouTube channels dedicated to Arduino provide visual learning for every skill level. Paul McWhorter’s “New Arduino Tutorials” series walks through concepts methodically; GreatScott! demonstrates advanced projects; Andreas Spiess reviews components and compares approaches. Video format clarifies connections and troubleshooting steps that written instructions sometimes obscure. Watching experts build projects illuminates techniques you’d never discover solo.
GitHub repositories host thousands of Arduino libraries and complete project codes. When tackling complex sensors or displays, existing libraries handle low-level details so you focus on your application. Learning to read others’ code accelerates your own development—see how experienced programmers structure logic, handle errors, and comment effectively. It’s like having millions of tutors available 24/7.
Local makerspaces and hackerspaces provide physical communities around electronics and making. These shared workshops offer tools, expertise, and camaraderie that home learning can’t replicate. Monthly meetings, group projects, and skillshare sessions accelerate learning while building friendships with fellow makers. Many offer classes specifically covering Arduino and microcontrollers.
Online courses through platforms like Coursera, Udemy, and edX provide structured curricula from universities and industry experts. These range from free introductory courses to paid certificate programs. The structured approach suits learners who need clear progression paths and accountability through assignments and deadlines. Certificates add credentials for students building portfolios.
Environmental Considerations for Electronics Projects
Responsible electronics practices matter increasingly as device proliferation continues. Buy quality kits that last years rather than disposable junk failing within months. Well-made boards handle thousands of programming cycles; cheap clones fail after dozens. The environmental math favors durability—one quality board beats five failures heading to landfills. Vote with your wallet for sustainability.
Component reuse extends kit value while reducing waste. Failed projects become parts donors—salvage working components for future builds. Resistors, capacitors, and LEDs survive many projects if handled carefully. Organize them in labeled containers rather than discarding with each teardown. This mirrors professional engineering practices while teaching resourcefulness.
Battery disposal requires proper handling—never throw lithium or NiMH batteries in regular trash. Many electronics retailers accept batteries for recycling; municipal hazardous waste facilities process them safely. Teaching responsible disposal early instills lifelong environmental consciousness. The same curiosity driving electronics exploration should extend to environmental stewardship.
Energy-efficient project design reduces environmental impact during operation. Use sleep modes to power down systems between measurements; choose efficient power supplies; select components with low quiescent current. These optimizations matter individually and compound across millions of makers worldwide. Teaching efficiency builds habits that transfer beyond hobby projects into professional work and consumer choices.
Frequently Asked Questions
❓ What age is appropriate to start with an arduino mega starter kit?
❓ Can arduino mega starter kit work with Raspberry Pi projects?
❓ How long does the arduino mega 2560 board typically last?
❓ Do I need prior programming experience for hands-on electronics learning?
❓ What's the difference between Arduino Mega and Arduino Uno for maker education?
Conclusion: Choosing Your Perfect Starter Kit
The best arduino mega starter kit balances your current skill level with future ambitions. Absolute beginners thrive with focused kits like the LAFVIN Project Super Starter, avoiding overwhelming component counts while mastering fundamentals. Intermediate learners ready for extensive exploration benefit from comprehensive options like ELEGOO’s Ultimate Kit or SunFounder’s Vincent Kit, providing components for months of varied projects.
Budget constraints shouldn’t derail your electronics journey—quality entry-level kits around $45-55 deliver genuine value without compromise. That said, the $15-20 premium for mid-range kits ($60-70) provides noticeably better components, tutorials, and support that minimize frustration. Think of it as insurance against beginner mistakes and an investment in sustained engagement rather than abandoned disappointment.
Consider your learning environment when selecting kits. Classroom settings favor organized storage and durable components that survive multiple student hands. Homeschool families benefit from extensive tutorials and varied project options supporting different interests. Solo learners might prioritize online resources and active community support over physical packaging.
The arduino mega starter kit you choose becomes your gateway into electronics, programming, and making. Start today—your first LED blink awaits, followed by sensor integrations, motor controls, and eventually projects you haven’t even imagined yet. The journey from “I wonder how this works?” to “I built this myself!” transforms more than skills—it shapes how you see and interact with technology forever.
Recommended for You
- Best Smartwatch for Kids Age 10 in 2026
- 7 Best Kids Basketball Hoop Adjustable for Backyard Fun 2026
- 7 Best Chess Set for Kids in 2026
Disclaimer: This article contains affiliate links. If you purchase products through these links, we may earn a small commission at no additional cost to you.
✨ Found this helpful? Share it with your friends! 💬🤗